
Use Of CANet Config software_GCAN
4 CANet Config software
The GCAN-202 can configure parameters by "CANet Config" software, can set working mode, IP address, CAN working mode, CAN’s baud rate and other basic parameters.
4.1 Connection
IP address must be filled when connecting to GCAN-202. If forget it, please restore factory settings and the default IP is 192.168.1.10. See chapter 3.1.1 for details.
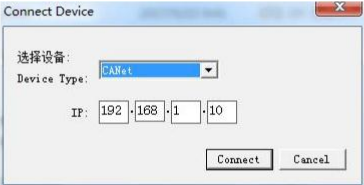
Click "Connect", and it shows the following software interface.
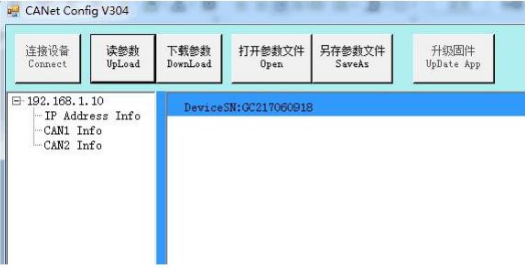
The meaning of the button:
"Connect" - connect the converter (Do not need to click again).
"Upload" – read configuration information in converter.
"Download" - download the configuration information into the converter's Flash.
Shenyang Guangcheng Technology Co., Ltd. Industrial-grade Ethernet-CAN converter-GCAN-202
"Open" – open and read the configuration information file in the computer.
"SaveAs" - save the configuration information file into computer.
"UpDate App" - upgrade the GCAN-202 firmware kernel. (Please use this function
under guidance)
4.2 Configure basic information
After finished the connection, click "UpLoad" to download the parameters of the converter to the computer.
"IP Address Info" - Ethernet-side parameters setting.
"CAN1 / CAN2 Info" - CAN-Bus parameters setting.
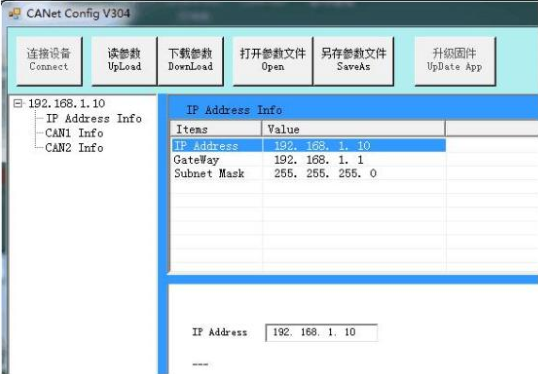
4.2.1 Ethernet parameters setting
Click "IP Address Info" to enter into the interface of Ethernet parameter settings.

"IP Address" - set the GCAN-202 IP address.
"Gateway" - set the GCAN-202 gateway.
"Subnet Mask" - set the GCAN-202 subnet mask.
4.2.2 CAN-Bus parameter setting
Click "CAN1/CAN2 Info" to enter the interface of CAN-Bus parameters setting.
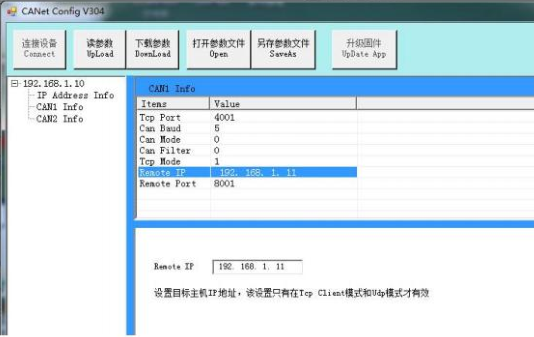
"TCP Port" - set the CAN-Bus communication port.
"Can Baud" - set the CAN-Bus communication baud rate; details in Table 4.1.
"Can Mode" - set the CAN-Bus working mode.
"Can Filter" - not open, the default is 0.
"TCP Mode" - set the TCP working mode.
"Remote IP" - set the IP address of the target server.
"Remote Port" - set the port number of the target server.
Note: "Remote IP", "Remote Port" is valid only in TCP Client mode and UDP mode.
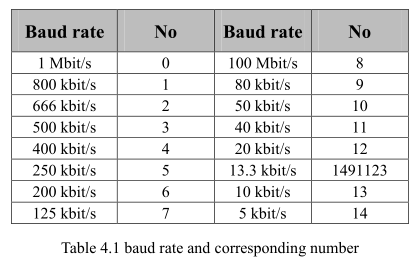
Note: you want the custom baud rate, please contact us.
4.3 Finish the configuration
After a parameter has been modified, this part got red. When the configuration is completed, click "DownLoad" to download the configuration information into the "Flash" of GCAN-202.
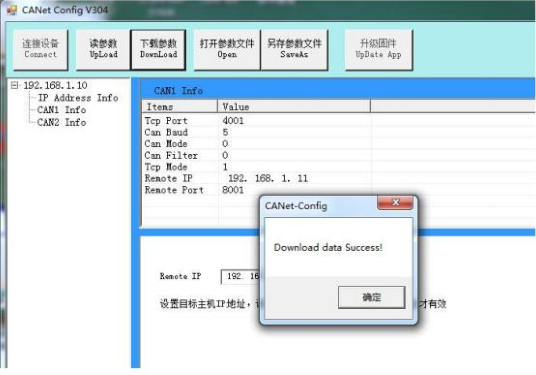
Note: re-power after completed the download, and then the new configuration will take effect.
4.4 Save/load configured files
"SaveAs" - save the configured files in your computer for later using.
"Open" - open the earlier configured files from your computer.
4.5 Update firmware kernel of GCAN-202
Please contact us.
The GCAN-202 can configure parameters by "CANet Config" software, can set working mode, IP address, CAN working mode, CAN’s baud rate and other basic parameters.
4.1 Connection
IP address must be filled when connecting to GCAN-202. If forget it, please restore factory settings and the default IP is 192.168.1.10. See chapter 3.1.1 for details.
Click "Connect", and it shows the following software interface.
The meaning of the button:
"Connect" - connect the converter (Do not need to click again).
"Upload" – read configuration information in converter.
"Download" - download the configuration information into the converter's Flash.
Shenyang Guangcheng Technology Co., Ltd. Industrial-grade Ethernet-CAN converter-GCAN-202
"Open" – open and read the configuration information file in the computer.
"SaveAs" - save the configuration information file into computer.
"UpDate App" - upgrade the GCAN-202 firmware kernel. (Please use this function
under guidance)
4.2 Configure basic information
After finished the connection, click "UpLoad" to download the parameters of the converter to the computer.
"IP Address Info" - Ethernet-side parameters setting.
"CAN1 / CAN2 Info" - CAN-Bus parameters setting.
4.2.1 Ethernet parameters setting
Click "IP Address Info" to enter into the interface of Ethernet parameter settings.
"IP Address" - set the GCAN-202 IP address.
"Gateway" - set the GCAN-202 gateway.
"Subnet Mask" - set the GCAN-202 subnet mask.
4.2.2 CAN-Bus parameter setting
Click "CAN1/CAN2 Info" to enter the interface of CAN-Bus parameters setting.
"TCP Port" - set the CAN-Bus communication port.
"Can Baud" - set the CAN-Bus communication baud rate; details in Table 4.1.
"Can Mode" - set the CAN-Bus working mode.
"Can Filter" - not open, the default is 0.
"TCP Mode" - set the TCP working mode.
"Remote IP" - set the IP address of the target server.
"Remote Port" - set the port number of the target server.
Note: "Remote IP", "Remote Port" is valid only in TCP Client mode and UDP mode.
4.3 Finish the configuration
After a parameter has been modified, this part got red. When the configuration is completed, click "DownLoad" to download the configuration information into the "Flash" of GCAN-202.
Note: re-power after completed the download, and then the new configuration will take effect.
4.4 Save/load configured files
"SaveAs" - save the configured files in your computer for later using.
"Open" - open the earlier configured files from your computer.
4.5 Update firmware kernel of GCAN-202
Please contact us.
